Tuesday, October 4, 2011

Adventures in Craigslisting

After weeks of back and forth emailing, and other potential buyers flaking, and rainstorms, and lions and tigers and bears, I was able to set a date and time to get a supercool vintage recliner for just sixty American dollars.
The time was 8am on a Sunday morning and the place was Not My Bed so my heroic husband volunteered to pick the chair up for me.  Apparently, the chair's former owner was just lovely, and helped him manuver it down skinny slippery steps lined with flower pots.  She had an adorable toddler that was crying the whole time.  Husband asked about the little darling, wondering if mommy should stop helping him move the chair to go see why the munchkin was so sad.  And she said, 'oh, this is just her favorite chair.'  Aw.  Poor kid. 
Now it just might be my favorite chair.  I don't know where she's going to live yet.


Then yesterday evening I went to pick up the perfect side table for this chair.  Only twenty dollars; I love Craigslist.  The nice lady gave me super specific directions to her house, telling me what shops I would pass and what neighborhood signs I would see.  She led me directly to her front door.  Almost.  She forgot to mention her front door was actually just a door to six apartments.  And she didn't tell me the apartment number.  I didn't have her phone number, and I wasn't about to drive home to email her, so I guessed.  Found her on the third try.  Her neighbors were quite nice.

Sunday, October 2, 2011

Sunday Scoreboard: Emeril - 1 Jaguars - 0

Today the Jacksonville Jaguars played the New Orleans Saints.  Like every week, I optimistically believed my Jags would triumph.  And like most weeks, lately, they did not.  But I was the winner of Sunday Dinner with my Saints-inspired Jambalaya.

I used Emeril's recipe here, with some tweaks in the portions because we love freezing one-pot meals for weekday lunches in my house.

First, I mixed up the Creole Seasoning here, exactly like Mr. Lagasse said so because he is the boss of New Orleans.

- 2.5 tablespoons paprika
- 2 tablespoons salt  (I only had kosher; it seemed to work fine.)
- 2 tablespoons garlic powder
- 1 tablespoon fresh ground black pepper
- 1 tablespoon onion powder
- 1 tablespoon cayenne pepper
- 1 tablespoon dried oregano
- 1 tablespoon dried thyme

Combine all ingredients thoroughly.
Yield: 2/3 cup

You will end up with extra; I saved it in an empty paprika container.  But I suspect any empty container will work.

Then comes my favorite part of cooking:  chopping.  I see all the pros chopping at lightening speed on Iron Chef, Next Food Network Star, etc.  But I much prefer Leisurely Chopping.  Below are the ingredients as I made them, but for a small batch you can refer back to the original recipe.

  • 25 medium shrimp, peeled, deveined and chopped

  • 2 chicken breasts, diced

  • 2 tablespoons Creole seasoning, recipe follows

  • 4 tablespoons olive oil

  • 1 chopped onion

  • 1 chopped red pepper

  • 3 large stalks celery, chopped

  • 3 tablespoons chopped garlic

  • 14 oz. can diced tomatoes

  • 6 bay leaves

  • 2 teaspoons Worcestershire sauce

  • 2 teaspoons hot sauce

  • 1.5 cup cup rice

  • 5 cups chicken stock

  • 1 12 oz. package Andouille sausage, sliced (I used Aidells)

  • Salt and fresh ground pepper


  • Rub the cajun spice mixture all over the chicken and shrimp so it can get yummy and flavory.  Then wash your hands about five times.


    Heat the olive oil on medium-high in a pot that you think is going to be big enough.  When the oil gets runny, add the onions, peppers, and celery.  Let it cook for a little while (the recipe says 3 minutes but I let it go about 6-7) while the veggies get a little soft.  The onions will start to get translucenty.


    Add the garlic and give it about two minutes to brown a bit in the hot oil.


    Add the can of diced tomatoes, juice and all, along with the bay leaves, Worcestershire sauce, and hot sauce.  I used dried bay leaves only because I forgot to buy fresh ones and I had the dried kind on hand.  But I think you should use fresh.  Next time I will.


    Once the tomatoes and juices are hot, stir in the rice.


    Slowly begin to add the chicken broth.  At this point, if you are me, you may find that the pot you originally chose is too small.  And then you may notice that you only have one other pan and it is gigantic.  Heat up the giant pan on medium heat with a bit of the broth in it (so you don't burn the pan) and then transfer everything to the larger pot.  Or....just start out with a bigger pot in the first place, but still turn it down to medium heat at this point.  Totally up to you.


    When the rice is no longer crunchy, after about twenty minutes or so (longer if you have to change pans), add the chicken and shrimp, along with a little salt and pepper.  Keep it on medium while the meat cooks.  Once you've tested it (and tested and tested, depending on how hungry you are), you can turn it down to simmer for awhile to really mix all those flavors.  I left it another 30 minutes and it was perfect.

    BONUS KNOWLEDGE:  I discovered a cool trick while making this dish.  It turns out, my stove is made of METAL.  And do you know what sticks to metal?  That's right!  Magnets!  I can keep my printed out recipes right in front of my face while cooking.  Convenient.  Did everyone already know this trick?  Yeah, I thought so.


    Tuesday, September 6, 2011

    Perfect Pillows

    My tale of Procuring the Perfect Pillows actually began waaaaaaay back in the spring when Chloe and Morgan came to stay.  Tired of my plain boring pillows, I picked up a few different ones at Home Goods and brought them home for a test drive.  They were pretty in the store.


    I hated them at home.  And so did Possum, my feline assistant.  They were too dark and too uncomfortable and too ruffley and too BIRD so back to the store they went.

    The old pillows were boring but very soft and cuddly and WASHABLE so there they stayed for several months.


    Perhaps now is a good time to mention that we just returned from a European vacation.  (I know, way to bury the lead, right?) 

    We visited Scotland, Land of Kilts and Castles.


    We visited Stockholm, Land of Ikea and Sensible Social Policy.


    And we visited Finland, Land of Moomin and Marimekko.


    I like to bring home usable souvenirs from our travels, things that remind me of where we visited but do more than collect dust on a shelf.  I hate dust, and I hate dusting even more.  So anything I put on a shelf is bound to collect dust.  My solution is not to dust more but instead to put less things on shelves.  But I digress.

    Our flight back to the States left from Helsinki Airport.  In that airport was a Marimekko store.  And in my wallet were some euros that were going to be useless to me at home.  I went in to have a look, maybe pick up a tea towel or something, and I found the most beautiful pillow covers on earth.  They looked like they might even fit the soft cushy pillows I already owned.  (Spoiler alert:  they DO fit!!)  There were many different gorgeous bright Finnish fabrics, and I spent a long time deciding which I liked best.  So long, in fact, that we totally avoided the long queue (that's European for line) getting onto the plane.  So long, in fact, the we almost missed the flight.  It might have been worth it.

    Upon arriving home, the first thing I did was, well, sleep for about ten hours.  But the SECOND thing I did was try on my new pillow covers.  Guess what?  They fit PERFECTLY.  (You knew that already, didn't you?)


    Chloe and Morgan love them too.

    Tuesday, June 14, 2011

    13 Points for M-A-G-N-E-T-S

    Recently while visiting the in-laws, I was rummaging around in their basement checking out some of my husband's preserved childhood relics.  I swear, that house always has new hidden treasures. 

    My dear mother-in-law has given me a (loud) working vintage General Electric fan because she just had a couple sitting in the basement.  It looks great on top of my 1950s china cabinet but is too frightening to actually use both because it sounds like a tornado and would probably maim a curious cat, what with it being built before safety standards and common sense.  (Or maybe cats and babies have just gotten dumber?) 

    She gave me a fantastic color block afghan made by her mother (or maybe her grandmother?) that was just hanging out in the back of one of her linen closets all shy and stylish.

    She gave me some vintage PanAm paraphernalia including a couple of bags and an actual flight attendant scarf.  From an actual flight attendant's uniform.  From PanAm.  Like whoa.  Because she has a friend that use to work for PanAm and she knows her daughter-in-law likes 'that 50s stuff.' 

    Seriously, I just never know.  It would not surprise me if she had a vintage Pyrex bowl in the laundry room to hold the dryer lint.  Sitting on an Eames chair.

    So this particular time I was looking through a stack of 1970s little boy's board games.  There were tens of tens of them.  Strange ones, like Haunted Mystery Manor and Save Scooby Doo.  (I just made those up.  I can't remember the real titles.  These were no Monopoly or Clue.  In fact, now that I am typing this, I want to go back and open those boxes and check out the actual board part of the board games because I think some of them will look great on the wall.  Ok.  Mental note.  But not the point of this post.)

    I found a Scrabble game and remembered a Super Crafty Idea that I read on the interwebs some time long ago about making Scrabble tile magnets and classing up the refrigerator.  And dude, my fridge needs help.  Exhibit A:


    So I brought home the Scrabble game and made some fridge magnets.  I even had a fun surprise when I opened the box and the wooden tiles were a cool red color instead of boring beige.  (Ok, I wasn't that surprised.  Nothing from that woman's magical house surprises me anymore.)

    It's super easy.  Just get some magnets and your trusty glue gun and maybe some cardboard if you are the messy type (like me).


    Make sure the magnets are smaller than the Scrabble tiles.  Duh.  Then just glue them onto the backs of the tiles and let them dry.  Hot glue is dry enough in about fifteen minutes but I let them sit overnight just to make sure.


    It also helps if you take this opportunity to rid the fridge of expired coupons and invitations to past events.  Ta-da! 


    I'm putting the over/under on the fridge being messy again at about seventeen minutes.

    Sunday, May 22, 2011

    New Kitchen Garden

    Not IN the kitchen...FOR the kitchen.
    I ventured out to a nursery (the plant kind) this morning.  All by myself.  Alone.  It was lovely, if slightly overwhelming.  Do you know they sell all sorts of plants in little pots?  Small ones, that you can conceivably make bigger.  With water, and sunlight, and, um.....photosynthesis?
    I've been cooking a bunch this past year, and I find myself using fresh herbs in lots of recipes.  Dude, fresh herbs are expensive.  And wilty. 
    So....I thought I'd grow my own and have super fresh herbs for cooking any time I want.  This morning's adventure was originally just a recon mission until I realized that each plant cost the same or less than buying a package of that same cut herb at the grocers.  I decided to just jump right in.
    I came home with parsely, sage, cilantro, thyme, terragon, oregano, basil, and chives.  Also fennel, a beautiful feathery plant that I have never actually cooked with but clearly should try because it is just too pretty.
    Oh, and two pepper plants and one strawberry plant, you know, for extra credit.  And some pots, fertilized soil, and rocks for drainage.  (The nice garden-store lady told me about the rocks.)  And that's pretty much it.  I hope I didn't forget anything;  I already have water and sunlight.
    It seemed my sad, rusty, empty little plant stand was not going to cut it.


    I had some cinder blocks and plywood in the basement and was able to quickly put together some dorm-style plant shelves.  I moved the plants into bigger pots and now I have an herb garden! 


    See the tiny little pots up there?  Those are all the little pots that the herbs came in.  I wanted to use them for something so I asked Google how to propogate rosemary and mint.  Google said I just take a cutting, strip half the leaves off, and plant it.  I have a hardy impossible to kill rosemary plant and so so much mint already growing on the patio.  We'll see if it works.

    Thursday, April 28, 2011

    Super. Cool. Coat Hanger. Trick.

    So this afternoon Observant Little Brother comes into my house and is all, 'what's with the empty space between those picture frames?'  I told him that was Reserved Parking for my groovy brass lobster, but standard picture hanging procedure just wasn't working.  And he says, 'why not just use dad's coat hanger trick?'  Um. What?
    'Dad's been doing this for ever.  Didn't he teach you?'
    Nope.**  So I quick got a lesson from Clever Little Brother. (Dad doesn't get credit because he didn't show me. There. That will teach him.)
    Here's how it all goes down.

    First you have to find just the right kind of magical coat hanger.  The best way to find these special mystical hangers is attached to your pants when your pants return from the cleaners.  Note: Not your shirts.  It's those pants hangers with the flimsy cardboard cylinder instead of a hypotenuse wire.  These ones.


    You will also need to locate some wire cutters (or kitchen scissors and a bit of determination).  Detatch the paper cylinder from the rest of the hanger.


    Notice that cool little hidden hook.  Next you cut the long part of the wire about six inches up.


    As you may have already cleverly worked out yourself, you can get two wall hangers out of each coat hanger.  Bend it so it arcs a bit like this.


    You will need to drill a hole in the wall big enough for the coat hanger to fit through.  Oh yeah, so you also need a drill.  (Or I guess you could hammer a nail into the wall and pull it out to make a hole in a pinch.)   Then you just feed the long bit through the hole and it will hold itself in the wall using magic.  I can't fit my camera inside that tiny hole so here is a dramatization using cardboard.


    You then have a hook perfect for hanging brass lobsters or any such non-flush-to-the-wall objects.  Look.  Isn't he cute?


    **I should note that my dad is the President of Coat Hangers.  Seriously, I collect them in the bottom of a closet so he is not bored when he visits.  He has about one thousand things he likes to do with coat hangers, 999 of which are useless.  It is possible that he did tell me and I was only pretending to listen.


    Sunday, April 24, 2011

    Just Like the Guggenheim


    I’ve hung my very own Gallery Wall.

    Last month during a trip to Ikea, I picked up a big pile of different sized white frames. They have been lying on the guest bed judging me ever since. They did not like living on the bed. They wanted to live on the WALL, their natural habitat. So this weekend I gathered all the necessary items to make their dreams come true.

    Necessary Items for Hanging Your Very Own Gallery Wall

    Frames
    Pictures for inside the frames
    Eighties music
    Picture hanging wire and nails
    Wine
    Electric drill
    Pencil
    Patience
    One calico cat

    I poured a medium sized glass of chilled pinot grigio, set some 80s mix CDs on shuffle, and got right to work. I laid out the frames on the floor in front of the wall where they would eventually live, changing them around and around and around (right round baby, right round) until I was satisfied with their placement.  I just sort of started with a few big ones in the middle to visually anchor the whole thing and scooted a bunch of little ones up close until I liked the way it looked.  At one point I even remembered to take a picture.


    It didn't end up this way, of course.  The cat didn't like it. 
    After about twenty more reconfigurations, I settled on an arrangement, refilled my wine glass, and added the pictures.
    The piece de resistance and major pop of color was a print I fell in love with during a past trip to Arizona.  My sneaky husband saw that I loved it and picked up a card from the gallery in Sedona.  He totally surprised me the very next Christmas and it has been waiting for a frame ever since. 
    The Abstract Fingerpainting was done by a three-year-old genius by the name of Sophia Raindrop.  She named it 'Fireworks.'  It's going to be worth millions someday.  It didn't quite fit in the included mat but I will fix that another day.
    Most of the others are photos I took on various vacations printed in black and white and masquerading as Real Art.  I do love that though the black and white fancies them up a bit, they are all personal memories from past travels.
    I didn't have any pictures small enough to fit in the tiny square frames, so I cut out a few pictures from a Lonely Planet calendar for two of them, and framed three peacock feathers in the others.  I will change out the calendar pictures eventually but I quite like the look of the feathers.
    Then I got to hanging (Oh, oh, oh, oh, oh....hanging tough).
    It only took seventeen million hours to hang all of the frames.  Ikea includes picture wire and these nifty little clip things with their frames, so it should have been easy.
    Two of them were in fact super easy.  They were centered on wall studs, purely by luck, and I just drilled in a wood screw and hung them. 
    MOST of the others were MOSTly easy.  I was hanging them on drywall, so all I had to do was predrill a hold, twist in one of my favorite drywall screws, drill in an actual screw leaving a tiny bit poked out of the wall for the wire, and center the picture. 
    The remaining problem children were more difficult, as I discovered bricks made of an impenetrable  substance inside the walls just two millimeters behind the drywall. Or maybe I just had the wrong drill bit, but whatever, it wasn't going to work.  I then had to remember high school Geometry and use two screws, usually one wood screw and one drywall screw, and balance the frames over two screws so they were (mostly) even.  Luckily, I saved the hard ones for last.  Geometry is way more fun after three glasses of wine. 
    Ta da!

    Notice the empty spot above the Fireworks masterpiece.  Don't be alarmed.  That spot is reserved for Mr. Pinchy Pants.  (Or maybe he is a Rock Lobster.)  I just can't figure out how to hang him yet.

    A gallery wall all for me, just like heaven the Met.


    Tuesday, March 22, 2011

    Birds Are So 2010

    Have you heard about Spoonflower?  You probably have, because I am often way behind the times.  But just in case you are as website-awareness-challenged as I, Spoonflower is a super cool site that allows anyone to upload designs to have printed on fabric.  You can order your own design or one uploaded by one of the many talented artists out there in Internetland.  I have no idea how long the site has been operating; I just recently stumbled upon it.  I'm telling you, I'm always late to the party.  (By the way, have you heard of this new site where you can bid on things like an auction?  Just kidding.) 

    There are quite a few designs for tea towel sized calendars on Spoonflower.  I had been coveting a beautiful fabric hanging calendar from etsy way back in January, but I was too cheap to spend $50 on something that would hang in the kitchen for only one year.  So I decided to order a $11 fat quarter and hang it myself.  Again, back in January.  Because each order is custom, it takes a few weeks to receive your fun new fabric.  I was so excited when the package arrived last month.  Yes, last month.  Remember when I said I was behind the times?  I wasn't lying.  Because this is what I ordered.


    I know, I know, birds are so 2010.  Obviously.  It says so right at the top.  I didn't even notice that this was a 2010 calendar.  Not when I ordered it.  And not even when I excitedly showed Sean my pretty new fabric.  He was all, "Um, this is 2011."  Wop-wop.

    So I gave it another go.  Weeks later, my fabric arrived.  Look, it even has the correct year.  Score!


    The artist is named Andrea Courchene and has an etsy shop here.   I ironed out the mailing creases, hemmed up the sides, put a small pocket on top, threaded a skinny dowel through the pocket, tied some yarn to the dowel, and hung it from a thumbtack in the kitchen.  So easy to make it can be done in one sentence.

    Thursday, March 10, 2011

    More Food That Starts With The Letter Q

    I kind of feel like quinoa is the new It Food.  I see it everywhere now, like we just invented it. Reminds me of blood oranges back in 2007, though I doubt adding quinoa would improve a martini.  Who knows?  I'm sure there's a restaurant somewhere sprinkling three grains in the bottom of a Quinoa Martini.
    I'm totally on board, however, because it is a perfect (healthier!) alternative to rice.  I like to make one-pot dishes that are usually meant to be served over rice.  Except I don't care for rice.  At all.  Ok, I hate rice.  I used to use couscous, but apparently quinoa is much better for me.  Plus it sounds fancy, and I love faux fancy foods.
    I learned about quinoa when my bff (The Most Awesome Person in the World) lived with me in 2009 and did a lot of cooking.  She left many mysterious items in the cupboard when she jetted off to Europe, including bags of this grain.  It apparently comes in different colors.  The all-knowing Google taught me how to cook it, and I've not looked back.
    Tonight I made a delicious meal in the crock pot.  I quick seared some boneless skinless chicken thighs, about two minutes on each side.


    I put them in the crock pot along with onions, carrots, a little butter, garlic, lemon juice, and about a cup of chicken stock. 


    I cooked it on high for about four hours, then turned it to low for the last hour and a half.  Just before they were done, I made some quinoa for the bottom of the bowls.  When quinoa is cooked, it grows little tails, like freaky little Darwinian grain.


    I had never made chicken thighs before (sheltered, I know) and DUDE THEY WERE SO TENDER.  I have had bad experiences with the crock pot, so i was really surprised.  I might be a slow-cooker convert now.  It makes me look good. 

    Actual dinner conversation:

    Taste tester 1:  Darlene, this is really good.
    Me:  Thank you, that's nice of you to say.
    Taste tester 2:  Thanks for making it taste good so we don't have to lie.

    Aw. 


    The recipe came from here, if you're interested.  You should be interested.  It's really good.

    Tuesday, March 8, 2011

    Fat Tuesday, Y'all

    Yay, Mardi Gras!  Parades. Jazz.  Beads.  I have been to New Orleans exactly once and enjoyed every meal minute there.  I didn't make it to Cafe du Monde until the last day of my trip, so I only had a breakfast of their famous beignets once.  I've been looking to recreate that ever since.

    Also, my DVR is full of food porn...er...food network shows.  Paula, Ina, Alton, and Rachel.  (Oh, and also a litte Guy Fieri, because, come on, he wears his sunglasses backwards.  He's ridiculous.)  Last month I saw a New Orleans themed episode of Paula's Best Dishes, wherein she made BEIGNETS.  I knew I needed a plan:  How can I make an entire batch of these babies in a way that doesn't seem like I just want to sit there and eat all of them?  (Even though I kinda do.)  I know: a Mardi Gras dinner party.

    I started with the New Orleans holy trinity of cooking:  onions, celery, and peppers.  I used red and orange peppers; I like them better than the green ones.  And I put them in just a little bit of bacon grease.


    I then added canned crushed tomatoes, ground pepper, and chopped garlic, and let it cook for about twenty minutes.  Then I added a bunch of shrimp and sliced andouille sausage (it was turkey sausage...shhh) and crumbled bacon.  Cooked about ten more minutes until the shrimp and sausage was done.  Put over a mixture of grains, the Harvest Blend from Trader Joe's.  Yum.


    This was adapted from the South Beach Diet's recipe for Big Easy Shrimp.  I just added way more veggies and the sausage.  (The recipe calls for only ONE celery stalk.  Come on, South Beach Diet, I thought you LOVED vegetables.)

    Then we put the Fat in Fat Tuesday.  Beignets are just fried dough.  Little rectangular donuts covered in powdered sugar and eaten while still warm.  SO FREAKING DELICIOUS.  I was a little worried they wouldn't hold up to the ideal beignets in my memory, but they turned out really good.    I couldn't find a written version of the recipe online, so I hung out with my pause button and took notes while watching Ms Paula Deen make them on the show.  Here you are, for your recreating pleasure.

    Paula Deen's Beignets

    First measure out seven cups of bread flour.  You'll need it when you don't have time to measure it out.

    Mix together in a large bowl
    1 1/2 cup lukewarm water
    1/2 cup granulated sugar
    1 envelope yeast

    Let sit for ten minutes.

    In a smaller bowl, mix together
    2 eggs slightly beaten
    1 1/4 teaspoon salt
    1 cup evaporated milk

    Beat together slightly, then add to yeast mixture.  Whisk together.

    Add about three cups of bread flour to the yeast mixture.  Keep whisking (a helper is nice for the constant whisking).
    Add 1/4 cup of solid Crisco to the yeast mixture.
    Keep whisking.  (Seriously, recruit a friend for this part.)
    Add the rest of the flour.  Whisk it on it there.
    Knead the mixture together.  Leave on all five of your giant rings.  (Apparently.  Paula did.)

    Spray a bowl with some sort of non-stick spray can stuff.  Put the dough in the bowl and cover it with a clean towel.  Let it sit for about two hours.

    (Now go have a glass of wine with your friends, cook dinner, eat dinner, and save room for dessert.)

    Heat ole...ohl...(I think she means oil) to 350 degrees.*

    *You know, in the deep fryer that you have built into your countertop.  What?  You don't have one of those?  I really hate when the cooking show hosts don't give alternate instructions when they start using equipment that only restaurant cooks and cooking show hosts have access to.  And maybe rich people.  In this case, I used a Fry Daddy.  Instead of 350, I turned it to 'ON'.  It seemed to work ok.

    Sprinkle a liberal amount of flour onto your cutting board.  If you have a normal residential-use sized cutting board like I do, only roll out half the dough at a time.

    Roll out the dough, not too thick, not too thin.  I did the first batch a little too thin, and it was still good.  It worked best when the dough was about the thickness of a slice of bread.

    Cut the dough into little rectangles.  She calls them squares, but they are not square.  More like fat rectangles.


    Cook them in the oil.  As soon as they pop up to the top, flip them.  I flipped them pretty frequently, so they didn't get too done on either side.


    When you take them out, first put them on a paper towel to drain a bit of the oil.  Then quick put them in some powdered sugar to get all yummy.  Then eat them while still warm.  Share (or not) with your friends.  At least share with the friend that helped you with the whisking.


    Saturday, March 5, 2011

    New Rug

    First of all:  I love World Market.  I just want to put that out there.  I mean, they carry Milka brand chocolate.  And their Mark West Pinot Noir seems to never be out of stock.  These things are important to me. 

    We stopped in this afternoon to pick up some wine, and they were having a Rug Clearance Sale.  Yay!

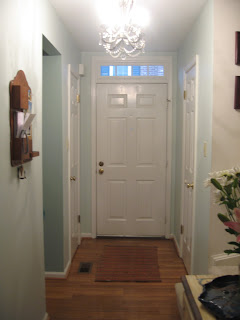
    Our old rug was from World Market.  It was fine, if a bit small and slippery.  But since I've painted, I am on a redecorating frenzy.  Here is the old rug in the freshly painted entranceway.


    It's fine.  Just sort of blends into the floor.  But I wanted something with some attitude.  I brought home two new rugs to try.  The first of the two is the same smallish, slippery style, just in brighter colors.


    Eh.  The bright colors that make it stand out from the floor actually make it seem smaller.
    The next one is much more fun with a Moroccan-esque pattern.


    Much better.  It's almost too big, but I kind of like that. It says, 'welcome to our home, we are not afraid of bright patterns here.'

    The countdown to the cats ruining it begins.